Knowing how to calibrate the Phantom 4 IMU is important. If your Phantom 4 is flying erratically, not flying or hovering correctly, then fly the quadcopter in and calibrate the IMU.
When the IMU is back in the green and within the ideal range, then it is safe to fly the Phantom 4 quadcopter again.
It must be noted that the Phantom 4 and Phantom 4 Pro IMU are calibrated differently. I have the IMU calibration procedure for both Phantom 4 and the Pro model below.
With the Phantom 4, you should not move the drone while doing the calibration. With the Phantom 4 Pro model, you place the drone in various positions during the calibration process.
Read the Phantom 4 IMU calibration instructions a few times and watch the below videos. Then it will be very easy for you. You can also print the instructions just in case you need to do an IMU calibration while out filming with your Phantom 4.
Remember, in some circumstances you may need to calibrate the Phantom 4 IMU a few times to get it right within range.
What Is The IMU – Answered
The IMU (Inertial Measurement Unit) is a critical component in your drone. If it is not working correctly, then there is a very good chance that you will crash your drone.
An inertial measurement unit works by detecting the current rate of acceleration using one or more accelerometers. The IMU detects changes in rotational attributes like pitch, roll and yaw using one or more gyroscopes. Some IMU include a magnetometer, mostly to assist calibration against orientation drift.
A computer continually calculates the quadcopters current position. First, it integrates the sensed acceleration, together with an estimate of gravity, to calculate the current velocity. Then it integrates the velocity to calculate the current position.
You can read further in this informative article entitled “Drone Gyro Stabilization, IMU And Flight Controllers Explained“.
DJI Phantom 4 / 4 Pro App
Note: The Phantom 4 uses the DJI Go App whereas the new DJI Phantom 4 Pro uses the DJI GO 4 App.
Phantom 4 With Dual IMU & Dual Gyroscope
The DJI Phantom 4 has in fact 2 X Inertial Measurement Units. This gives the Phantom 4 real flight stability and also redundancy in case of failure. In the DJI Go App, these are listed as IMU1 and IMU2 in the calibration page of the DJI Go app. Both Phantom 4 IMU are calibrated at the same time.
Ideal IMU Accelerometer and Gyroscope Range
For the Accelerometers, you should be at around the 0.0003 for ACC1 and ACC2. The Gyroscope GYRO 1 and 2 should also be around the 0.0002 or 0.0003 mark. If your Accelerometers and Gyroscope are around the 0.0006, you can easily reduce this down to 0.0003 with an IMU calibration.
Phantom 4 IMU Calibration Procedure
- Choose a very flat surface for the Phantom 4 IMU calibration (very important)
- Remove the propellers before you start the compass calibration
- Have your batteries fully charged in the Phantom 4 quadcopter, the Remote Control and your tablet of smart cellphone
- Next, start up the Phantom 4 Remote Controller
- Start the DJI Go App
- Start up the Phantom 4 quadcopter
- In the DJI Go App, click on the “Camera” settings
- Up in the left hand corner, click on the little quadcopter (attitude) button which is the main settings page
- Scroll down and click on the “Advanced Settings”
- Click on “Sensors”
- Click on “IMU Calibration”
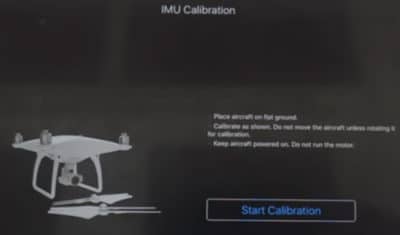
- Click on “Start Calibrating”
- A popup message will appear saying “Calibration Requires Approximately 5 Minutes. Do Not Move Aircraft During Calibration”
- Click OK and the IMU calibration will start
- Then next page will show you the IMU calibration progress. Stay on this page during the Phantom 4 IMU calibration
- The Phantom 4 has dual Inertial Measurement Units which will be calibrated at the same time
- When the calibration reaches 100%, a popup message will appear stating “Calibration Complete. Restart Aircraft”
- Click OK
- Power down and then restart the Phantom 4 to complete the calibration process
- You will need to power down the Phantom 4 again and then put back on the propellers
After the IMU calibration, it is also a very good idea to calibrate the gimbal and also to calibrate the Phantom 4 compass. If you are having Phantom 4 flight issues such as flight drops or erratic flying, then you can also calibrate the Vision Positioning System on the quadcopter.
How To Calibrate the Phantom 4 Gimbal
- In the DJI Go App, click on the “Gimbal Settings” icon
- Then click on “Gimbal Auto Calibration”. Click “OK” on the popup message
- Next you will see a gimbal calibration process
- The gimbal on the Phantom 4 will move around during the process
- When it reaches 100%, you will get a “Gimbal Calibrated” message on screen

Notes on Phantom 4 IMU Calibration
- Calibrate on a very flat surface
- Make sure to do the IMU calibration away from electromagnetic objects
- Remove propellers before starting
- Batteries should be at least half charged but better if they are fully charged
- In the Sensors Page in the DJI Go App, the Accelerometer and Gyroscope should be showing green
- You may need to do the IMU calibration more than once if they are still outside the above ideal ranges
- Calibrate the gimbal after the IMU calibration
- Calibrate the compass outside following the successful IMU calibration
Here is a terrific video showing you how easy it is to calibrate the IMU on the Phantom 4.
How To Calibrate the Phantom 4 Pro IMU
The procedure to calibrate the Phantom 4 Pro is slightly different than the Phantom 4. With the Pro, you will move the quadcopter into various positions to calibrate the IMU. It is still quite and easy step. Read the below instructions a couple of times and watch the below video.
The Phantom 4 Pro uses the DJI Go 4 App. Here is the Phantom 4 IMU calibration procedure.
- Choose a very flat surface for the Phantom 4 Pro IMU calibration (extremely important)
- Remove the propellers before you start the compass calibration
- Have your batteries fully charged in the Phantom 4 Pro quadcopter, the Remote Control and you tablet of smart cellphone
- First, start up the Phantom 4 Pro Remote Controller
- Start the DJI Go 4 App
- Next, start up the Phantom 4 quadcopter
- In the DJI Go 4 App, click on “Go Fly”
- Click on the three dots in the top right hand corner to go into the “General Settings”
- Click on the little quadcopter button at the top of the screen
- Scroll down and click on the “Advanced Settings”
- Click on “Sensors”
- The next screen shows you the dual IMU and dual Gyroscopes
- Click on “Calibrate IMU”
- Click on “Start Calibrating” and follow the onscreen prompts. This is where the Phantom 4 and Pro models are different
- In the bottom right you will see 1/6 so there are 6 steps to calibrate the IMU on the Phantom 4 Pro
- The first step 1/6, you don’t need to do anything
- On the second step 2/6, you need to put your Phantom 4 Pro on its side as it shows on screen
- In step 3/6, you need to put the quadcopter on its other side
- Step 4/6, place the Phantom 4 Pro with its nose pointing down
- Step 5/6, place the quadcopter with is nose pointing up
- In the final step 6/6, place the Phantom 4 Pro upside down
- When the last step is complete, you will see “IMU Calibration Complete” message with a green check mark
- The green check mark shows the procedure has been a success
- You can now exit back to the camera settings
- Shut down the Phantom 4 quadcopter and put back on the propellers
It is also very good practice to calibrate the gimbal and also the Phantom 4 compass after the IMU calibration. You can find this information just above the first video.
Note: If you need any components or accessories for your drone, then check out our DJI Phantom 4 parts, upgrades and accessories page. If you are having further issues with your quadcopter then, you can contact DJI Support.
Now to finish off here is an excellent video which shows the full Phantom 4 IMU calibration procedure along with gimbal calibration.