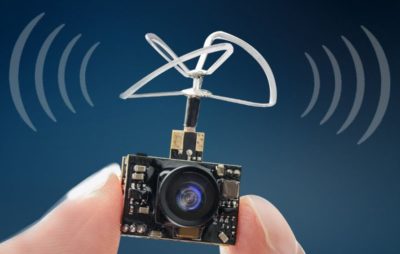
FPV cameras are small, light and reasonably priced. The FPV camera is mounted onto a drone to send real time video down to the ground using a video transmitter. The FPV camera allows you to see where the drone is flying and what it is seeing as if it had its own eyes.
Depending on the drone, the FPV transmitter will send the live video signal to your Remote Control screen, monitor, smartphone device, tablet or FPV goggles.
FPV cameras like the one you find on the DJI FPV allow you to fly higher and further with some of latest drones being able to fly up to 5 miles away using FPV technology. Military drones or large high-end drones can fly thousands of miles using FPV technology.
This post answers the question of what is FPV camera systems and technologies. Here we explain the latest FPV camera technology on small consumer, commercial and FPV racing drones including CMOS or CCD imaging sensors, Fields Of View (FOV), TVL, Dynamic Range and much more.
When you understand FPV camera technology in drones, then you have the knowledge to make changes and expand the distance of the FPV live video. Another terrific article for you to read is entitled “Extending Drone Live Video, Gain And Range” which discusses further on how antennas, transmitters and receivers work.
What Is FPV Camera Technology In Drones
This below information is from DroneTrest article entitled FPV Camera Buying Guide.
Dedicated FPV Cameras
If you are already using a HD camera on your drone such as a GoPro, Foxeer Legend, or Runcam HD, you can just connect the video transmitter directly to the camera to get a live video feed. This is fairly common for most aerial photography drones as it lets you see what is in frame of your camera before you record or take a photo.
However the downside of using your action camera for FPV is that they all have latency issues. Although latency typically is around 100 to 200 ms (milliseconds), it is hardly noticeable with general flying and filming. However, this latency difference is too slow for FPV racing drones.
When flying at 50 mph (a typical speed for an experienced FPV racer), a 100 ms delay can mean your drone will travel about 6 feet before you receive the video, which could mean the difference in you missing an obstacle or hitting it. By using a dedicated FPV camera, your FPV system will have a much lower latency. A latency of less than 40 ms is what you can expect.
In the rest of this post we will assume that you are deciding upon using a dedicated FPV camera and we will discuss the relevant aspects which you need to consider when using a dedicated FPV camera.
FPV Camera Image Sensors – CCD or CMOS
The image sensor of your FPV camera will affect its performance. FPV cameras use either a CMOS or a CCD sensor. So which is better? The short answer in terms of image quality is the CCD sensors are better. However CCD sensors are more expensive and for FPV applications the slight improvement in image quality does not always justify the extra cost.
When CMOS Camera Sensors Are Better
As mentioned above, the main advantage of CMOS cameras is that they are cheaper than CCD cameras and have good enough performance for FPV applications. Cost can be an important factor even if you are an ace FPV pilot as it is not uncommon for you to crash your FPV racing drone. Since your camera is mounted in the front of your quadcopter, it is usually the first thing to absorb the impact.
However most decent FPV racing frames have some sort of camera protection built in to avoid the camera taking the full impact. CMOS cameras are also usually lighter and use less power than CCD which is only really important on some micro drones, but it is still something in their advantage.
In general most drone pilots use CMOS cameras due to their wide availability and cost. We currently recommend this 800 TVL CMOS 1.4 camera for FPV.
When CCD Camera Sensors Are Better
CCD cameras use a global shutter which mean the entire image is captured at the same time. CMOS cameras use a rolling shutter and capture the image pixel by pixel from top to bottom which creates a rolling effect.
For FPV applications this usually means that when you have vibrations on-board your drone, it causes the unwanted jello effect. CCD cameras do not have this problem and usually have a wider dynamic range which mean they perform better in very bright and very dark conditions. Better than CMOS cameras.
Note: View this large selection of top FPV cameras for drones on Amazon, which cover all the various specifications.
No products found.
FPV Camera Video Transmission Latency
The latency of your FPV camera is caused by the camera processing all of the information from the image sensor. The faster the processing, the lower the latency. Action cameras like the GoPro are processing highly detailed images (up to 4k) while also outputting live video to your FPV transmitter.
This means they have a lot more information to process so most high definition action cameras have much higher latency values than a dedicated FPV camera which run on much lower resolutions.
As discussed previously although it is hardly noticeable with general flying, most drone pilots prefer to use a dedicated FPV camera when flying a racing drone. A 100 ms latency delay when flying at 50 mph can mean your drone will travel about 6 feet before the pilot receives the video. In many instances the drone has already crashed before the pilot realizes it.
Most FPV cameras have a latency of less than 40 ms, while most action cameras will have a latency of 140 milliseconds or more.
The GoPro is an extremely popular camera and many drones are manufactured with the GoPro in mind. If you are building your own drone and want to use a GoPro as your FPV camera, then this first video will show you how.
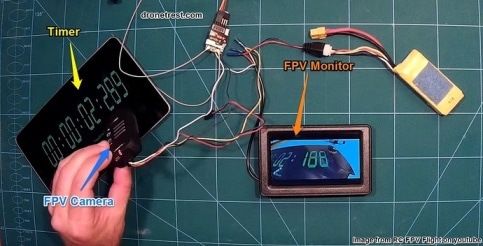
Measuring Latency
You can easily measure the latency of your FPV equipment. All you need to do is make your FPV camera face a timer or stopwatch, with its output visible on your FPV monitor. With a second camera you take a photo of both the stopwatch and your FPV monitor in the same shot.
By comparing the time visible in your photo of the timer and the FPV monitor, you can see how long the signal took to travel from your FPV camera to your FPV monitor which is the latency. An example of this is shown below where the FPV camera has a latency of about 100 milliseconds. Here is another article regarding the whole area of low latency video transmission.
FPV Camera TVL Resolution
Because most FPV cameras work on analogue video, we measure the resolution in TV lines or TVL, rather than actual pixel counts common with digital video. TVL is a measure of the horizontal resolution of the camera. The higher the TVL resolution will mean a higher detailed image captured by the camera.
In general, it is always better to get a higher TVL resolution camera if you can. That said, TVL is not the only factor which dictates how good the picture is, as other factors such as color reproduction, latency and dynamic range are also very important.
Common TVL resolutions for cameras are 420, 480, 600 , 800 and 1000 TVL resolution.
How many TVL do I need?
There is much debate on the internet about the maximum TVL, which can feed through a standard analogue FPV transmitter. The most important factor will be the resolution of your FPV monitor or goggles. Since most FPV goggles are around VGA resolution (800 x 480), an FPV camera of 800 TVL or less would be required.
DJI now have 3 FPV goggles on the market, including a high definition transmission system, which includes FPV camera, Air Unit, Goggles and Remote Controller. The live video is excellent along with an exceptionally low latency.
All of the DJI Goggles are reviewed here, including the Digital FPV system which can be used on DIY drones, racing drones and robots.
Bandwidth of FPV Transmitter
The other factor is the actual bandwidth of your FPV transmitter, where higher resolutions require more bandwidth. Since my knowledge is fairly limited regarding transmitter bandwidths, I have yet to find an absolute answer. But as far as I can tell, the general consensus is that the max TVL resolution you can use is 600 TVL.
However some people on various forums claim you can go up to 1000 TVL. I cant tell the difference of resolution above 600 TVL.

FPV Cameras & Field of View
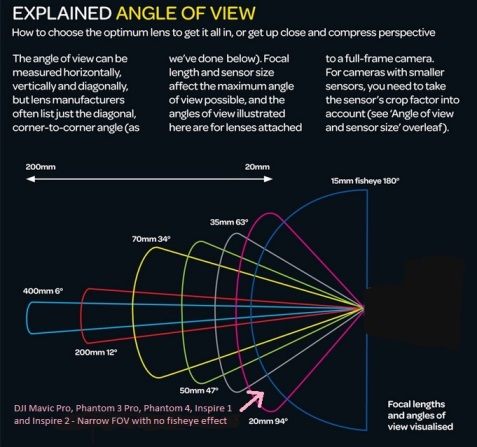
The Field of View (FOV) of the FPV camera is a measure of how much it can see around it as defined by an angle as shown below.
Field Of View And Lenses
When buying an FPV camera sometimes they do not specify the field of view in angles, but rather by the lens focal length in mm. The table below can be used to see the approximate field of view for each lens. The human eye has a focal length of about 2.97 mm;
- 1.2 mm lens – 185°
- 1.7 mm lens – 170°
- 2.1 mm lens – 158°
- 2.5 mm lens – 147°
- 2.8 mm lens – 130°
- 3.0 mm lens – 127°
- 3.6 mm lens – 92°
- 4.0 mm lens – 88°
- 6.0 mm lens – 78°
Usually for FPV applications, having a higher field of view is better, as it allows you to see a wider area. However, this can sometimes distort the images where the horizon is often curved as shown below. The latest top drones have cameras which aren’t affected by this barrel fisheye effect.
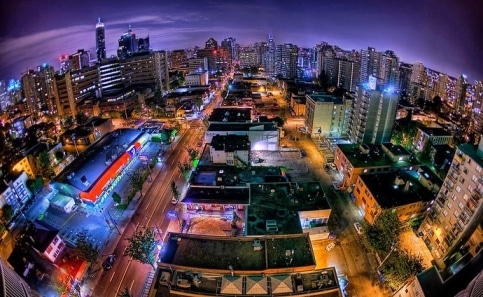
Here is an example of barrel fisheye distortion an aerial camera with a wider field of view.
What Field Of View Is Best?
Some pilots prefer to use narrow field of view, while others prefer to use wider field of views. It is best to try various cameras find a field of view which you are comfortable flying in. Some FPV cameras allow you to swap in and out various lens which means you can easily try various fields of view.
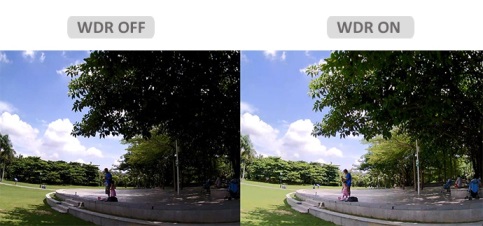
FPV Camera Dynamic Range
The dynamic range of your FPV camera dictates how well your camera can record the details in very dark and very bright areas of an image. An example is shown below. When Wide Dynamic Range is off, the shadow areas show little detail compared to when Wide Dynamic Range (WDR) is enabled.
This is important and very noticeable for FPV flying as you will usually be looking at the horizon. If your camera has a low dynamic range, it will focus above the horizon making the ground black, not letting you see any details.
A simple solution for this, is to tilt the camera slightly downwards so you always see more ground. The camera will then adjust the exposure to make the ground visible with the sky a little washed out.
The dynamic range of a camera is generally not published, but nowadays most FPV cameras are set to have wide dynamic range enabled out of the box. It is best to ask the shop assistant or read the reviews of a specific FPV camera before buying it.
FPV Cameras – Infrared Cut / Sensitive
In general most cameras, be it for FPV or for general aerial cinematography have an infrared cut filter built into them. An IR cut filter will block out any infrared light from reaching the camera sensor as IR light can cause the video to look a bit washed out.
By adding an IR cut filter to the camera, the video will have much brighter and vivid colors. It is much better to choose an FPV camera with an IR cut filter (chances are if the product does not mention this, it’s because it has one built as industry standard).
Now, there are some special situations when you want to have an IR sensitive camera, particularity in low light. IR sensitive cameras allow you to see better during dusk and dawn as they allow more light into the camera.
However, there is a compromise with poorer color quality. A comparison between the two are shown below where you can see the IR blocked camera has much more vivid colors.
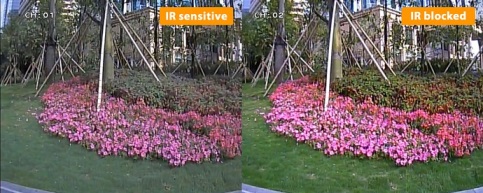
A great FPV camera which lets you choose between IR cut and IR sensitive versions is the Runcam Swift 2.
FPV Cameras To Extend The Range Of Transmission
If the range of your live video transmission is say 1.5 mile (2.4 km) and you would like to fly further, then you can extend the range of video transmission with some small changes.
Using Omnidirectional and Directional Gain Antenna Together
The ideal way to receive live video is to use both a directional antenna to get the maximum video in one direction. Then use a diversity controller along with an omnidirectional antenna, to receive the FPV live video when you move outside and behind the directional antenna.
What this really means, is that when you are flying, there will be areas where the omnidirectional antenna is going to have the stronger signal and other areas where the directional antenna will have the stronger signal. A diversity controller will switch between the directional antenna and the omnidirectional antenna.
Diversity Controllers
A diversity controller is used to bridge at least two wireless video receivers together. You can buy diversity controllers with many channels very easily. Many drone enthusiasts build their own 2, 4 and 6 channel diversity boards.
A Diversity Board needs to be able to receive 2 different channels at the same time and to be able to automatically switch to the best antenna. An example of a Diversity Board, also known as a Diversity Receiver is the FR632.
FPV Night & Starlight Cameras
As discussed above, when using cameras in low light, having an IR sensitive filter can improve things. There are also a few specialist cameras which are designed to work in darker conditions allowing you to fly during sunset or sunrise when it is darker.
In many countries, it is not legal to fly at night, but it is possible. There are two options here. The first is to use a starlight FPV camera, which has a very low lux sensitivity enabling it to work in very low lighting conditions.
Light sensitivity, or minimum illumination, refers to the smallest amount of light needed for the camera to produce an image of usable quality. Minimum illumination is presented in lux (lx), which is a measure of luminescence.
In general, provided it is not overexposed, the image will be better the more light which is available in the scene. If the amount of light is insufficient, the image will be noisy or dark.
The other option is to use a camera with no IR filter and use some IR LED lights to illuminate the front of your FPV drone. However, this only works well when flying low to the ground close to other objects in which the infrared light can bounce off on.
FPV Information And Basic Setup Video
Another top FPV Camera is the Eagle Sparrow Swift Predator and the next video reviews this FPV camera along with 3 other cameras.