Having the fisheye effect in your aerial photos is a big problem. However, barrel distortion correction in your existing aerial photos can easily be solved with a number of software programs.
This post with examples and videos show you exactly what fisheye distortion is, how it comes about and how you can remove it using 5 different software programs.
The fisheye correction applications discussed below are Adobe Lightroom, After Effects, Photoshop, PTLens and Gimp. The videos are very informative and should expand on your existing knowledge of aerial photography and filming.
Also, check out our aerial photography camera tips post, which will assist you in capturing even better video and stills.
What Is Barrel Distortion / Fisheye Effect
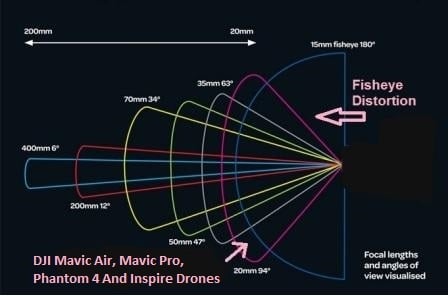
Barrel distortion is 1 of 3 types of optical distortion with the other 2 types being pincushion and mustache. Barrel distortion is common with using wide angle lenses because the field of view of the lens is much wider than the size of the image sensor.
The field of view needs to be squeezed to fit, resulting in straight lines being visibly curved inwards and especially the outer edges of the frame. The straight lines are curved inwards in the shape of a barrel.
Barrel distortion is typical on most wide angle prime lenses and quite a few zoom lenses with relatively short focal lengths. The amount of distortion can vary, depending on camera to subject distance.
One of the most popular cameras on modern day consumer drones is the GoPro camera which are famous for their wide angle look and also the fisheye effect in both aerial photos and video.
This year has seen most of the newer drones having integrated cameras which are designed specifically with aerial photography and filming in mind.
The latest top drones use a 20 mm focal length lens with a 94 degree field of view. So, we don’t have the fisheye effect on these drones.
The fisheye effect happens when a shorter lens with a wider angle is used.
Fisheye Correction
Below, we highlight various barrel distortion correction software. Applications covered are Adobe Lightroom, After Effects (Video), GoPro Studio, PTLens, Gimp and Adobe Photoshop.
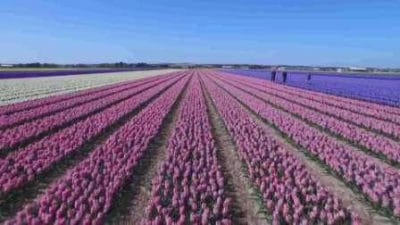
The photos in the below examples are snap shots from videos in our best drone videos category of articles. Some of these videos have the fisheye effect, but are still very beautiful.
Fisheye Correction Software Using Adobe Lightroom
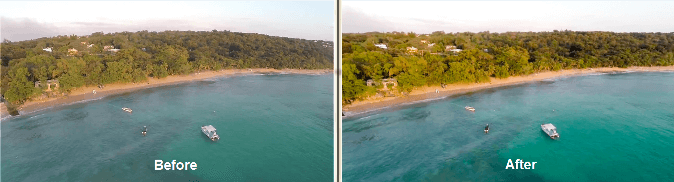
Adobe Lightroom is a very efficient and easy way to remove the fisheye effect from your photos. The below photo took less than half a minute and I added some vibrant colors along with removing the barrel distortion.
Adobe Lightroom has lots of features, so it is much more than just a tool for fisheye correction. It is great value for money when using all its other features. You care read more on the latest version Adobe Photoshop Lightroom here.
For fisheye removal, this software is very easy to use. You import your photos which have barrel distortion. Then follow the below steps;
- Click on “Develop”.
- On the right hand side, scroll down to “Lens Correction”.
- Click on “Basic” and put a check in both “Enable Profile Correction” and “Remove Chromatic Aberration”.
- Click on Profile – This is where you can choose your camera model and the barrel distortion correction will be automatic if you have one of the camera models.
- Click done when finished.
Some photos are easier than others to remove the fisheye effect. This Adobe Lightroom fisheye correction tutorial video shows you how to remove the barrel effect with their application.
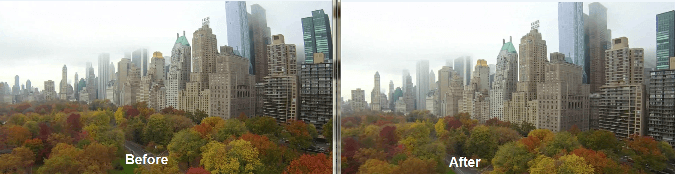
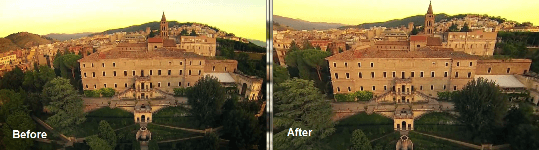
Fisheye removal using Adobe Lightroom examples.
Here is another example using the Adobe Lightroom software on barrel distortion on the vertical.
Fisheye Effect Removal Using GoPro Studio
You can remove the barrel distortion and apply a lens adjustment to the converted GoPro CineForm file, giving it a smaller FOV. Here is how to do it;
- Import & Convert. Select your clip and click “Advanced Settings”. The file must be coming from the GoPro camera with the original file naming convention.
- In Advanced Settings check the “Remove Fisheye” option. Click OK.
- Add the clip to the Conversion List and then Convert the Clip. The fisheye effect will be removed.
At the end, there is another video showing you how to remove the fisheye effect from GoPro photos.
GoPro have a number of Apps for editing your photos. The latest GoPro Studio application is called GoPro Fusion Studio, which can do the following key features;
- Easily stitch and render high-res spherical content.
- Quickly offload content directly from Fusion or a content folder.
- Adjust color using presets or fine-tune manually.
- Transform your footage using Little Planet, Fisheye and other effects.
- Add gimbal-like stabilization that uses sensor data to smooth out all your footage.
- Customize audio with 360 surround sound or advanced wind noise reduction.
- Use the Export Wizard to optimize content to fit your workflow.
- Sync up with Adobe® Premiere® and After Effects®.
You can read and find our more about GoPro Fusion Studio here.
Fisheye Distortion Removal Using PTLens Software
This simple application does a nice job in fixing fisheye lens distortion. PTLens is a small application which is quick to install and it compatible with Windows 2000 and upwards. There is also a MAC version. Download PTLens.
Removing the fisheye effect is very much a manual process with PTLens. You choose the fisheye button and then adjust the sliders for distortion, rotate, vertical and horizontal etc. It is a very handy program, easy to use and free. Here’s an example of using PTLens to remove barrel distortion.
Lens Fisheye Correction Using Gimp Software
Depending on the severity of the fisheye effect, you may be able to correct the barrel distortion using Gimp with the latest GIMP 2.10.18 software being released in April 2019. GIMP features a lens distortion filter to adjust the effect but, depending on the image, you may have to crop the edges for the best results.
Out of all the software to remove the fisheye effect, Gimp was the hardest to make adjustments to the photos and the result wasn’t as good. However, as an overall software application, GIMP is terrific. It is also free. Below is the instructions using the older GIMP 2.8.
- Press “Ctrl-O” in GIMP, and then select the photo with the distortion that you want to correct.
- Click “Filters” from the menu bar, select “Distorts,” and then click “Lens Distortion” from the drop-down list to open the Lens Distortion filter menu.
- Click the “Preview” check box if it is not enabled by default so you can see a preview of the adjustments you are making before applying them to your image.
- Click and drag the “Main” slider to the left while checking the results in the preview window. The amount of correction depends on the severity of the distortion, so use the preview window to judge the results.
- Click and drag the “Edge” slider to the left or right, depending on the distortion around the edges of your photo. Once again, use the preview window to determine the optimal amount of adjustment.
- Click “OK” when you are satisfied with the preview window to apply the correction to your photo.
- Select the Crop tool from the Toolbox, and then click and drag your cursor over the part of the image with the least distortion. The aim is to exclude the areas around the outer edges, which are too distorted to correct properly. Double-click the images to apply the crop, and then save the results.
These instructions apply to using GIMP 2.8 for correcting barrel distortion. It may vary slightly or significantly with older versions of the software.
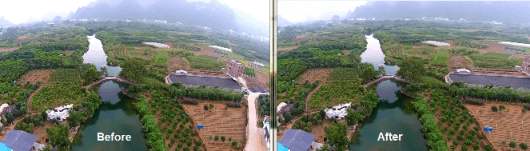
Here is a before and after sample using the Gimp filter for fixing lens fisheye distortion.
Correct GoPro Fisheye Effect With Adobe After Effects
Here a quick look at how to correct the barrel distortion created by the GoPro camera using the terrific Adobe After Effects software. Here is a link to the latest version of Adobe After Effects.
To finish off this article, here is another terrific short tutorial which further explains lens distortion and how to remove it using Photoshop.