Here is 15 of the best drone photography tips to ensure you capture great aerial photos every time.
The drone photo tips cover lens filters, filming in RAW format, the thirds grid, UAV forecast, auto exposure bracketing, counterpoints, juxtaposition, lighting, leading lines, creating depth in photos and much more.
These drone photo tips are simple to understand and easy to implement.
With a little practice along with a quality drone, you will become an expert drone photographer with a great eye for the best aerial angles, perspectives and camera settings.
Many of these tips can be used for both aerial and ground photography.
Remember, it’s important to have fun while flying and learning all about aerial photography. Having a drone, which has the capabilities to take great aerial photos and video is also very important.
Along with the aerial photo tips, there are links and videos for further reading on the various tips along with links to the latest drones which make aerial photography very easy.
15 Top Drone Photography Tips For Stunning Aerial Photos
Here are the 15 drone photo tips, with great explanations on each tip further down the article;
- Capture aerial photos in RAW format
- Check the UAV forecast and plan your drone photography session
- Pack spares and accessories for your drone and camera
- Remove what you don’t want in your aerial photos
- Use the thirds grid to improve composition and balance in photos
- Keep it simple and exaggerate landscape or other elements
- Use high quality lens filters on your drone camera
- Symmetry, counterpoint, juxtaposition and abstract photos
- Creating depth in your aerial photos
- Use leading lines for stunning aerial landscapes
- Capture different angles and perspectives
- How to get the lighting right in your aerial photos
- Drones with Auto Exposure Bracketing (AEB) with High Dynamic Range
- Capture perfect high resolution panorama shots
- Shooting in Aspect Ratios 3:2, 4:3 and 16:9
Before we start with our drone photography tips, you can read another terrific article on actual best camera settings, which includes very easy to understand explanations of ISO, White Balance, Shutter Speed, Aperture, Metering and much more.
Tip 1 – Capture All Aerial Photos In RAW Format
The first tip and so easy to implement is to shoot all your aerial photos using digital RAW format as it gives you so much more versatility in image post processing. Aerial photos captured in RAW format are uncompressed lossless images from the camera sensor. Lossless compression means the size of the image is reduced without any quality loss.
The RAW image holds a significant amount of detail and resolution which is preserved, including more levels of brightness, allowing you to make greater exposure and color adjustments without making the photo look unnatural.
Tip 2 – Check The UAV Forcast And Plan Your Photography Session
UAV forecast websites and UAV forecast apps give you important information for planning your drone photography session. On these UAV websites or apps all you need to do is input the location you will be flying your drone in. The UAV forecast will provide information including areas, which are off limits, the weather for the day, solar activity, how many GPS satellites are active within a particular area, and much more.
Tip 3 – Pack Spares And Accessories
As a drone photographer wanting to capture the best photos, you need to plan for all eventualities. Bring along drone spares and accessories such as extra batteries, propellers, cables, chargers and filters. Also don’t forget to pack some lunch as it’s not easy to capture great aerial photos on an empty photos.
Tip 4 – Remove What You Don’t Want From Your Aerial Photos
Figure out what your aerial shot is all about and think about what you really want in the photo. Then try to remove the rest. So, if there is too much sky in the aerial photo, then angle your drone camera gimbal to have more landscape in the photo and remove as much sky as possible.
Also, get up as close as possible to what you want in the photo, whether your aerial shot is of landscape, people, flowers or wildlife etc. Then try to eliminate everything else from the aerial shot you want.
Now with a drone, you have to be careful. The latest top drones fly super stable and can fly right in and hover in front of the subject you want to capture. But you have to make sure you don’t crash your drone. Also drones, which have obstacle sensing will start beeping as you get close to an object which can be pretty loud and annoying.
The best option is to get as close as possible to what you want in your photo without the vision sensor beeping. Then, if you have a drone with a zoom lens, you can zoom right in on your subject and get the perfect photo.
The DJI Mavic series of drones all have a gimbal dial on the remote control so you can move the gimbal and camera up and down to remove too much sky etc. For a drone with a zoom camera, DJI recently released the Mavic 2 Zoom quadcopter, which has a 4 x zoom, including a 2 x optical zoom (24–48 mm).
Getting closer is one of the best aerial shot principles to always remember.
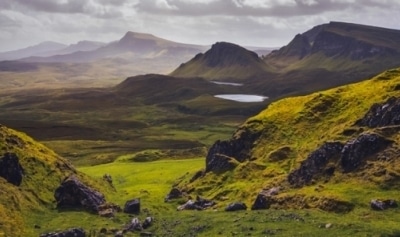
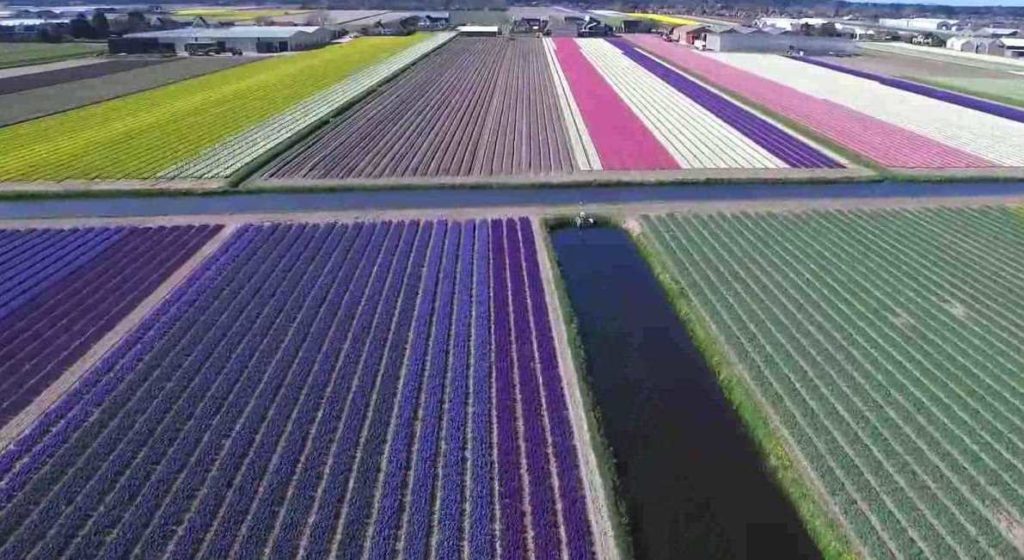
Tip 5 – Use The Thirds Grid To Improve The Composition And Balance Of Photos
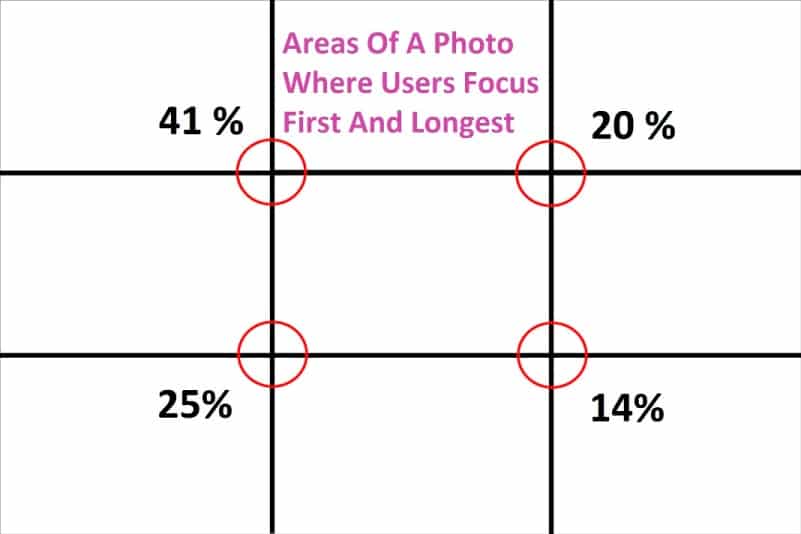
Moving your subjects away from the center, is known as the “Rule of Thirds“. The rule of thirds is an essential photography technique. It can be applied to any subject to improve the composition and balance of your images.
Off center composition is more pleasing to the eye and looks more natural than one where the subject is placed right in the middle of the frame. It also encourages you to make creative use of negative space, the empty areas around your subject.
When you are viewing your potential aerial shot, imagine dividing it down into thirds. So you should have 9 boxes as above, which is 3 x 3 boxes (horizontal and vertical). Then put your most important aerial shot elements along the lines and in particular the 4 points of intersection.
The top drones from DJI, Yuneec, Walkera etc have First Person View (FPV), allowing you to see on your remote controller or smart phone exactly what the camera on the drone sees while flying. In the drone app such as DJI Go 4, you can then choose grid lines in the camera settings. This will then allow you to use the rule of thirds for your aerial shots.
Tip 6 – Keep It Simple And Exaggerate Elements
When you study your subject and know what you want in the photo, think about how you can exaggerate it’s form or characteristics. Try some of the following;
- Having contrasting colors in the shot to make the image stand out
- Take the aerial shot using another angle using one object against another to get a sense of scale
- Zoom in on one particular feature
- Test using different cameras settings such as focal length or white balance to get different perspectives
- Use a long shutter speed. When you use a long shutter speed, you end up exposing your sensor for a significant period of time. The first big effect of shutter speed is motion blur. If your shutter speed is long, moving subjects in your photo will appear blurred along the direction of motion. This effect is used in quite a few advertisements of cars and motorbikes, where a sense of speed and motion is communicated to the viewer by blurring the moving wheels. Long shutter speeds are typically above 1 second
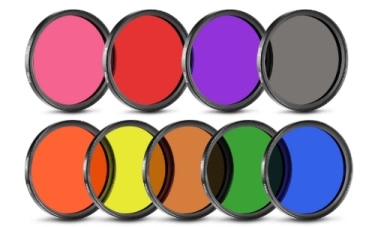
Tip 7 – Use High Quality Lens Filters On Your Drone Camera
Using aerial lens filters on your drone camera will bring your landscape aerial photography to the next level. You just need to know the basics of how they work and have a solid understanding of what types of filters you can get.
You can now buy camera filter kits which include the lens filter ring adapter, a microfiber cleaning cloth and a carrying pouch. A full camera filter kit would include something like the following lens filters;
- Ultraviolet UV
- Circular Polarizer CPL
- Neutral Density (ND2, ND4, ND8)
- Close Up Macro
- Yellow
- Red
- Purple
- Blue
- Green
- Orange
You can buy various kinds of lens filters, but only some of them are widely used for landscape photography.
 Neutral Density (ND) Lens Filter – A neutral-density filter, or ND filter, preserves colors, while modifying the intensity of light. A neutral-density filter allows for a long exposure time, thus creating a stunning effect of running water.
Graduated Neutral Density (GND) Lens Filter – Also known as a graduated ND filter, it is very similar to a neutral-density filter. The only real difference is that the GND filter has a variable light transmission, making it extremely useful for pictures which include a brightly lit horizon with a darker landscape.
The filter evens out the scenery and prevents the sky from being overexposed and the landscape from being underexposed.
Warming / Cooling Lens Filter – This type of filter does exactly what its name says: it changes the color temperature of the scene, which can be used to add a bit of warmth to a cloudy landscape or to correct an unrealistic color cast. Warming and cooling filters effect the white balance in the photo and most DSLR cameras today have the feature to automatically adjust the white balance.
Circular And Linear Polarizers – These lens filters are a must have tool for every drone photographer. It is the first filter drone landscape photographers buy to instantly improve their pictures by adding vividness and contrast to them.
Polarizing filters suppress glare and reflection from surfaces such as lakes, rivers, sea and glass. This filter can also darken a blue sky. It also reduces the reflection of sunlight coming off shiny leaves if you were filming green vegetation in sunny weather.
Polarized lens filters work by reducing the amount of reflected light which passes through to the camera sensor. The result is a noticeably improved saturation and subtle changes to the balance of the light in the photo.
The above are some of the main camera lens filters which you should carry. Buy only high quality lens filters.
Your drone photography will improve dramatically by using lens filters. It a great subject and you can read further in this article entitled “Aerial Lens Filters For Landscape Photography Explained“.
Tip 8 – Counterpoint, Juxtaposition and Abstracts In Aerial Shots
There are times when the rule of thirds isn’t the best option or their is a better aerial shot available. Here as some ideas.
Split your aerial shot in half or quarters etc. Supposing your aerial shot is capturing a snowy mountain, which is reflecting in a lake. Then a great aerial shot would be to capture the top half with the snowy mountain and the bottom half capturing the reflection in the lake.
Or an aerial shot, which contains counterpoints, juxtapositions or even creating an abstract.
A counterpoint is where there are at least two elements within an image and where each object would be independently beautiful or suitable for a great aerial shot. It is the combination of these different elements or subjects, which would make great independent photos, are photographed together making an image, which is substantially more beautiful than the independent photos.
Juxtaposition is when you put two opposite things together, and the contrast of those two things becomes interesting. With juxtaposition, you are making a statement through the contrast of elements you put in the frame.
Abstract photography generally don’t adhere to the rule of thirds or any particular rules. Abstract photography is a method of expressing ideas with photographed image elements without the intention of creating a traditional or realistic image. By avoiding and going beyond the usual representations of an object, scene, or any particular element, it reveals details that are normally ignored and triggers the viewer’s imagination.
Tip 9 – Creating Depth In You Aerial Photos
Use the near, far photography technique to create depth and pull people into the aerial shot. A photograph with a feeling of depth and perspective is much more engaging and interesting. There are a number of techniques you can use to enhance the feeling of depth in your shots.
Use these tips for creating depth in your aerial photography. These tips are from the article entitled “Creating a Sense Of Depth In Your Photos“.
Interesting foreground – For a great aerial photo with a feeling of depth, you need to include an interesting foreground subject close to the drone camera. This leads the viewer’s eye around the scene, from the foreground to the subject in the distance.
Frame the scene using the foreground – Use foreground objects to create a natural frame around the subject in your photograph. This enhances the sense of depth by guiding the viewer through the scene.
Use a wider angle – Take the aerial photo with a wider angle or zoom out which naturally exaggerates the perspective in a scene, achieving a greater sense of depth.
Use leading lines – Lines which move from the foreground into the scene create a feeling of motion, drawing the viewer’s eye along them.
Overlapping Objects – By overlapping objects you help the viewer to reconstruct the 3 dimensional scene in their mind. This allows them to mentally be “in” the scene, rather than just seeing a photo of it, creating a much stronger sense of depth.
Shoot in Portrait – Think about the way we see the world. If you look straight ahead and move your head from side to side your eyes naturally fall on objects, which are about the same distance away. But move your head up and down and you will focus on objects at greatly varying distance – from very near to very far away.
Photograph closer to ground level – Flying the drone closer to the ground exaggerates the perspective as objects get smaller as they move into the distance, creating a greater sense of depth.
The DJI Mavic Air, Mavic Pro 2 and Phantom 4 Pro V2 drones all have terrain follow modes. This means that your drone will fly at the programmed level above the ground even if the landscape is rolling or elevating etc. In other words, these drones won’t crash into the ground, while flying at close to ground level because of the terrain mode.
Tip 10 – Capture From Different Angles and Perspectives
Look for various angles to photograph the various elements in photos.
Most of the latest 4k camera drones and in particular DJI drones have intelligent flight modes to allow you to capture aerial photos from various perspectives.
The latest Mavic Air 2 released in April 2020 has the following filming modes and much more including obstacle avoidance;
- Rocket: Ascend with the camera pointing downward
- Dronie: Fly backward and upward, with the camera locked on your subject
- Circle: The Mavic Air 2 circles around the subject
- Helix: Fly upward, spiraling around your subject
- Boomerang: The Mavic Air 2 flies backward around the subject in an oval path
- Asteroid: In Asteroid Quickshot, the Mavic Air 2 flies backward and upward. It takes several photos, then flies to it’s starting point
- Trace: The Mavic Air 2 tracks and follow you at a constant distance. This works in all 3 flight modes (Normal, Sport, Tripod)
- Parallel: The Mavic Air 2 will follow you at a constant angle from the side. This works in all 3 flight modes
Another excellent quadcopter is the tiny Mavic Mini, which was released in late 2019. This has the following automated filming modes;
- Rocket: Ascend with the camera pointing downward
- Dronie: Fly backward and upward, with the camera locked on your subject
- Circle: The Mavic Mini circles around the subject
- Helix: Fly upward, spiraling around your subject
The original Mavic Air quadcopter has the following flight modes, which capture aerial photos and video from various angles and perspectives.
- ActiveTrack 2.0
- Hyperlapse
- QuickShots
- Points Of Interest (POI 2.0)
- Waypoint Navigation
- Cinematic Mode
- TapFly
Now the Mavic Air QuickShots give you some great angles for capturing incredible aerial shots. Here are the QuickShots modes on the Mavic Air.
- Rocket: Ascend with the camera pointing downward
- Dronie: Fly backward and upward, with the camera locked on your subject
- Circle: The Mavic Air circles around the subject
- Helix: Fly upward, spiraling around your subject
- Asteroid: In Asteroid QuickShot, the Mavic Air flies backward and upward. It takes several photos, then flies to it’s starting point
- Boomerang: The Mavic Air flies backward around the subject in an oval path, rising as it flies away from its starting point. It then descends as it flies back in
The Mavic 2 Pro and Zoom quadcopters have all the above QuickShots and 1 totally new QuickShot, which is as follows;
- Dolly Zoom: The Mavic 2 Zoom flies backwards and upward. It then adjusts the zoom during flight to keep the selected object the same while the background changes. Here is a video which shows you the Dolly Zoom
Tip 11 – Use Leading Lines
If there is multiple subjects or elements in your potential aerial photo, then look for a visual leading line to connect these elements. If you have your angles right, then leading lines add an element of depth and a journey through your photo.
Great examples are using a river, a sand dune, mountain ridge, lines in sandstone rock or a long crack in a lake covered in ice leading from foreground to background.
Tip 12 – Get The Lighting Right
For landscape and outdoor photography, sunrise and sunset are the best time to fly and capture great aerial photos. Morning and evening generally have great skies with the light being more suitable in both foreground and background elements.
If you have to fly and photograph during the day, then cloudy conditions work well. Also if there are possibilities to photograph your aerial shots from shade, then these conditions will be better than in direct sunlight.
If you have to photo during the day when the sun is strong, then use directional lighting for your aerial photos. This means, you shouldn’t photograph directly into the sunlight as this will leave your photos almost black. With directional lighting, you photo along with the sun, away from the sun or have the sun at an angle in your aerial photos.
If you have to capture a shot directly into the sun, then expose to the brightest part of the scene and let everything else go in the shadow. Cameras today have great capabilities to retain detail from the shadows in a photo. Then in post production, you can recover a lot of the detail from the shadow of the aerial photo.
Photography in direct sunlight is difficult and here is a terrific article called 11 tips for taking photos in direct sunlight.
Tip 13 – Auto Exposure Bracketing And High Dynamic Range
The latest and best drones on the market today have technology with make aerial photography and filming so much easier than a few years back. Technology such as Auto Exposure Bracketing (AEB) with High Dynamic Range (HDR) allow you to shoot the same photo several times at different exposures and settings, giving you more choices to work with.
You can simply select the photo with the best exposure levels, or you can combine them all into one photo and use the best parts of each shot.
All the latest DJI drones including the Mavic series and Phantom 4 Pro V2 all have AEB with HDR
Tip 14 – Capture Perfect High Resolution Panorama Shots
Quite a few of the latest drones have built in Panorama Mode, but if your drone’s camera does not have this feature, you can take a number shots while panning the camera to capture more of a certain scene. The photos can then be stitched using an editing software such as Adobe Lightroom to create a single, high-quality panoramic image.
This technique will allow you to capture higher resolution images and retain important image details, as well as capture an entire scene which can’t be taken with a single wide angled shot due to the legal height limit for unmanned aerial vehicles.
In the below video, it shows you how to create a 360° interactive photo panorama using the DJI Mavic Pro with the Litchi app and some panorama stitching software.
Tip 15 – Shooting in Aspect Ratios 3:2, 4:3 and 16:9
In the professional photography industry, we often refer to image size as aspect ratio. Both terms are generally used interchangeably. When setting up your camera to capture a photograph, image size is the term used to describe the active horizontal and vertical dimensions of your camera’s digital sensor. These dimensions are expressed in a ratio of width:height with width always coming first.
Almost all popular digital cameras has a sensor with one of these two aspect ratios: 3:2 or 4:3. These aspect ratios are based on film sizes from decades ago. The most popular film size ever is the 35 mm. The 35 mm strip of film was measured at 35 mm tall.
So, the native aspect ratio of your drone photographs is determined by the width:height measurement of the sensor in the camera. You can override the native aspect ratio using the drone cameras settings generally either on the remote controller or drone app.
If you select an aspect ratio different than the native ratio (for example, you change it to 16:9, when your drone has a maximum sensor image ratio of 3:2), you are essentially allowing the camera to crop every image, even before you transfer the images on to your computer.
The 16:9 aspect ratio size is offered as a camera setting on drones generally for film making because this is the same ratio as in wide screen television cropping. As a drone photographer, you might think 16:9 aspect ratio gives a nice panoramic feel to an image. This is true, but you are cropping away pixels before you get to the editing table.
In weighing up the pros and cons of image sizes, there are more good reasons to stick with the largest native aspect ratio, which is the greatest number of pixels you can effectively use for each photograph captured by your drone camera.
As a drone photographer, you want to have the maximum number of pixels available on the image sensor each time you capture a photograph. More pixels captured means more pixels to work with when it comes to post processing.
Once you load drone images into your computer for editing using something like Adobe Lightroom, then you will be able to make better cropping decisions, given a wider field of pixels from which to select. Final cropping at home or in the office on the computer makes good sense for the following reasons.
- You have a larger viewing screen.
- You are no longer under a time constraint where the drone is draining its battery in the air while trying to crop.
- Cropping an image while the drone is flying is not too easy.
Drone Photography Tips – Videos
Now, to finish this aerial photography tips post, we have 3 terrific videos.
Now to finish, here is a nice video which explains most of the above tips for taking great photos.