To repair and replace your Parrot AR drone parts is quite easy. Fixing your AR drone will also save you time and money. This article with AR drone repair videos show you how to inspect and replace your Parrot AR drone parts.
The below videos cover everything from checking and maintaining your AR drone, to replacing parts such as the mainboard, navigation board, central cross, bearings, gears and motors.
At the very end of this article, we also have some good information on how to fix ultrasound emergency errors on your Parrot AR drone.
Having your Parrot drone parts in great condition is essential for the best flying experience and to avoid crashes. Inspecting your Parrot AR drone parts every couple of days will keep your quadcopter flying perfectly.
By checking parts such as cogs, shafts and blades to make sure they aren’t bent, cracked or broken, will help ensure your quadcopters operates at its best.
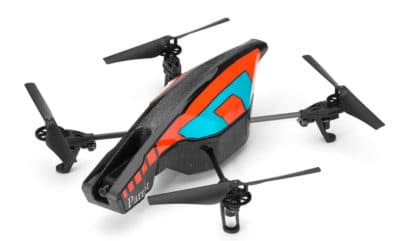
The Parrot AR is a terrific drone. It is fast, acrobatic and fun to fly. It is also one of the most d-i-y friendly drone on the market. Every part is easily replaceable. The Parrot AR has probably been the best selling drone of all time.
I hope this article and videos are of great assistance so you can quickly get back to having some great flying fun.
How To Replace Parrot AR 2.0 Drone Parts
Maintain And Replace Gear, Shaft and C-Clips Parts
This video shows you how to check, inspect, lubricate and replace cogs, pins, shafts, new blades and clips on your Parrot AR. This is a thorough video giving you loads of information to maintain and replace your Parrot AR parts.
Replace Central Cross Parrot Drone Part
This is a detailed video on how to remove and then replace a broken Parrot AR Central Cross. It takes approximately 2 hours. The video shows what tools and parts you need and then takes you step by step on how to remove the parts and then install the new AR drone central cross part.
Replace Mainboard Parrot Drone Part
Watch the below drone video and follow the 11 steps to successfully replace you AR Drone mainboard part.
- Remove the motherboard cover screws
- Remove the motherboard cover
- Remove the motherboard screws
- Unplug the motherboard battery cable
- Unplug the 2 motherboard data cables
- Mount the new motherboard
- Plug back in the 2 motherboard data cables
- Fix the new motherboard screws
- Plug back in the motherboard battery cable
- Replace the motherboard cover
- Final Step : Fix the motherboard cover screws
Replace Parrot Drone Parts – Navigation Board
Here is how to replace a damaged navigation board. He certainly makes it look easy. Watch the below video and follow these 7 steps.
- Remove the motherboard ( in video 2 above)
- Remove the navigation board support
- Remove the damaged navigation board
- Mount the new AR drone navigation board
- Replace the navigation board support
- Replace the AR drone motherboard
- Fix the motherboard screw
Note: If you need any components or accessories for your quadcopter, then check out our Parrot AR 2.0 parts, upgrades and accessories page.
Parrot AR Ultrasound Emergency Troubleshooting
 Ultrasound Emergency Troubleshooting. If your drone experiences an “Ultrasound Emergency” error on screen or your drone seems to fall from the sky uncontrollably or doesn’t seem to know distance from the ground.
Ultrasound measures the distance from the ground so if you are getting this error, you should bring your drone in to land pretty quickly. If the ultrasound isn’t working at all, you won’t be able to take off.
So you can try the following to fix the ultrasound emergency error. Be careful and handle all the parts gently when you open your drone;
- Before opening your parrot, check to see if you have the latest firmware for you Parrot AR. If not then update to the latest version.
- Open up the Parrot AR and check all cables to make sure they are correctly seated and that none of the cables are work or damaged. Make sure all cables are tight and replace and worn or damaged cables.
- After you have checked all the cables check and blow away and dust etc inside the parts. Dust causes static electrical interference.
- Examine the cover over the 2 ultrasound sensors. The sensors may not be lined up perfectly or the cover may be hampering the sensor. I have seen where one Parrot owner was able to fix the ultrasound error by simply cutting part of the plastic off. Just about 1 inch of the end so the cover is not anywhere near the ultrasound sensors.
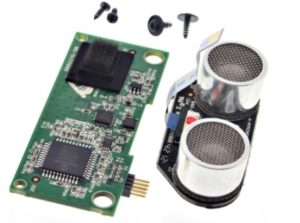
- Check the connection to the pressure sensor. Peel off the plastic bottom and take a look at the navigation to mainboard connections. Remove the three connection points and remove the navigation board. Next, check the pressure sensor (it’s the black square with a bit of foam visible on the top) on the top side of the board. This may not be stuck on correctly. Peel it off and stick the black pressure sensor to the board.
- You may have a faulty transducer. To fix this you would need to replace the Navigation board and there is a video above on how to replace this part. The navigation board includes the sensors, which are 1 ultrasonic transceiver and 1 ultrasonic receiver.
Remember, if your AR Drone is in warranty, then you should contact the Parrot AR support team to have this problem fixed. Or contact the shop where you purchased your Parrot AR 2.0. Generally opening your drone while it is in warranty will void the warranty.