Knowing how to calibrate the Mavic 2 Pro and Zoom vision sensors is very important.
If your are receiving the Mavic 2 Vision system error, or if your quadcopter is flying erratically, not hovering correctly, then you need to calibrate the Mavic 2 Vision Positioning System.
Also, if the Mavic 2 vision system is not working correctly, then it may not detect and avoid obstacles.
Below are the instructions on how to calibrate the Mavic 2 Pro and Zoom vision system including videos. You will also find tips to fix the Mavic 2 vision sensor and system errors.
If you are flying your Mavic 2 and the Vision Sensor Calibration error or Vision System Error occurs, you need to fly the quadcopter in straight away and re-calibrate the Mavic 2 VPS using the below instructions.
If the Mavic 2 calibration doesn’t fix the flying difficulties, then check to see if there is a Mavic 2 update available and use the excellent tips below to fix the Mavic 2 vision system error.
The full Mavic 2 calibration is done with the DJI Assistant 2 software. However, if you have no computer with you, then you can perform a quick vision sensor calibration using the DJI Go 4 app.
If you have the original Mavic Pro, then you visit our Mavic Pro vision calibration article as there are differences in the Mavic Pro and Mavic 2 vision system calibration.
How To Calibrate Mavic 2 Vision Sensors And System
Below are the instructions to calibrate the Mavic 2 Pro and Zoom vision system to fix errors while flying, hovering or obstacle sense and avoid issues.
- Download the DJI Assistant app (Apply and Windows versions available).
- Remove the Mavic 2 propellers.
- Power on the Mavic 2 quadcopter.
- Connect the quadcopter to a computer using a USB cable.
- Launch the DJI Assistant 2 application on your computer.
- Select Mavic 2.
- Click Calibration on the left side in the DJI Assistant 2 software.
- Watch the tutorial a couple of times, which show you how to calibrate the Mavic 2.
- Click Next and Calibration Now.
- Face the Mavic 2 front sensors at the computer screen.
- Adjust the Mavic 2 position so that the green rectangle is covered by the red rectangle.
- Keep the Mavic 2 in its current position and slowly move the drone along with the blue background.
- When the Mavic 2 forward vision sensors are calibrated a prompt will pop up, stating Forward Camera Calibration Complete with a green check mark.
- Click Start Downward Camera Calibration to continue.
- Keep the Mavic 2 with its downward vision sensor in its current position facing the computer and slowly move the drone along with the blue background.
- When the Mavic 2 downward vision sensors are calibrated a prompt will pop up stating Downward Camera Calibration Complete.
- Click Start Rear Camera Calibration to continue.
- Keep the Mavic 2 with its backward vision sensor in its current position facing the computer and slowly move the drone along with the blue background.
- When the Mavic 2 backward vision sensors are calibrated a prompt will pop up stating Rear Camera Calibration Complete.
- Next, fold the back legs under the Mavic 2 before starting to calibrate the side vision sensors.
- You won’t be able to fold the back leg fully on the side which has the USB cable on. That is OK.
- First, hold the Mavic 2 with the right side, which contains the USB cable to face the computer and move the quadcopter along with the blue background.
- When this side sensor is calibrated a pop up box will state Right Camera Calibration Complete.
- Then turn the Mavic 2 to the left side and calibrate by following the blue boxes on screen.
- After both sides of the Mavic 2 are calibrated, the DJI Assistant performs calculations. If calibration is successful, you will see a green check mark with Calibration Complete message.
- Then restart your Mavic 2 drone to complete the calibration.
Below is an excellent Mavic 2 calibration tutorial video.
Calibrate Mavic 2 Vision Sensor Using DJI Go 4
It is possible to do a quick calibration of the Mavic 2 vision sensors using the DJI Go 4 app. This could be a quick fix if you receive the DJI Mavic Vision Sensor Calibration error or Vision System Error.
Other reasons to calibrate the Mavic 2 VPS is if you feel the Mavic 2 isn’t hovering as stable as it normally does or if you feel the Mavic 2 is slow detecting obstacles or just not flying as it should.
If you don’t have a laptop with the DJI Assistant 2 app to do a full Mavic vision sensor calibration, then you can do a quick Mavic vision sensor calibration using the DJI Go 4 app.
To do the quick Mavic vision calibration, tap on the Aircraft Status in the DJI Go 4 app. Then click on Vision Sensors and start the quick calibration.
What To Do If Mavic 2 Vision Sensor Calibration Fails
- Insure that you have the latest Mavic 2 firmware before calibrating the vision sensors.
- Only calibrate the Vision Sensors when the light is good and never calibrate near or over reflective surfaces.
- Remove the propellers before starting the calibration.
- It is best to have batteries full or as close to full on your laptop and Mavic 2 just in case the vision sensor calibration takes longer.
- Give yourself plenty of space and have no interruptions while you calibrate the Mavic 2 vision sensors.
- Calibration of the Mavic 2 vision sensors require more or less only wrist movement to pivot, tilt and rotate the drone to follow the blue squares on the screen.
- Insure you fingers aren’t covering or close to the vision sensors while calibrating the Mavic 2.
- Leave the Mavic 2 on during the full process until you see the “Calibration Complete” message.
- Don’t forget to restart the Mavic 2 after calibration.
- If you are using a laptop and the DJI Assistant 2 is not properly recognizing the Mavic 2 sensors, then try it on a normal desktop computer with external display.
Fix Mavic 2 Vision System Error
The Mavic 2 vision system error does not have to be coming from the vision sensors. It could be caused by the infrared sensors, which are part of the whole Mavic 2 Vision Positioning System. So the process of calibrating the vision sensors would not correct the system error if the problem is with the infrared sensors.
If you’re quadcopter is only new and you are receiving the Mavic 2 vision system error, it is important to troubleshoot the problem as quickly as possible.
With all new DJI products, there is always the option to return the quadcopter but this return period is not very long. However, don’t send it straight back without checking the Mavic 2 and following the below steps as it could be something very simple causing the Mavic 2 vision system error.
Here are some instructions on what to try when you receive the DJI Mavic Vision system errors.
- If the Mavic is only new, check that there is no tape or packaging covering the vision sensors on the forward, rear, downward and both sides.
- Switch off the Mavic 2, take the battery out and leave it off for about 3 minutes.
- If the light is insufficient, then the Mavic 2 vision sensors won’t work properly. See below.
- The Mavic 2 vision system won’t work correctly or not at all over polished or reflective surfaces giving cause to the vision sensor See below.
- Ensure the vision sensors are clean. Use a soft cloth to remove any dust or debris from the sensors.
- Check other parts of your Mavic 2. If the quadcopter isn’t flying correctly because of bent or broken propellers or other parts, then incorrect information will be sent back to the flight controller, which could lead to the to the system error.
- Check to see if there is new Mavic 2 firmware available.
- Calibrate the Mavic 2 vision sensors using DJI Assistant 2 software as described above.
- Try the DJI Go 4 Mavic quick calibration described above.
- Check that you are getting a strong GPS signal in P-Mode.
- Calibrate the Mavic 2. If the IMU / compass is not calibrated, the flight control system will not receiving correct information and this may effect the vision system error.
As well as vision sensor issues, you may be having issues where the Mavic disconnects from the Remote Control or DJI Go 4 app.
If you are experiencing these Mavic 2 disconnect issues, then read our article on fixing Mavic Pro and Mavic 2 disconnects. The article covers all the many reasons which can cause the drone disconnecting from the remote or DJI Go 4 app. Looks at cables, ports, SD cards, smartphone cache, app settings and more.
Performance Of The Mavic 2 Vision System
The Mavic Vision System is affected by its surroundings with the infrared sensor under the Mavic been affected greatly by the surfaces it is being flown over.
Here are some notes on instances and surroundings which can adversely affect your Mavic Vision system;
- Flying over monochrome surfaces such as pure black, white, pure red, pure green.
- Flying over reflective surfaces.
- Flying over transparent surfaces.
- Flying over moving objects or surfaces.
- Flying over surfaces that strongly reflect infrared waves away such as mirrors.
- Flying at high speeds of over 31 mph forward and 27 mph backward to allow the Mavic 2 sufficient time to brake.
- Flying over small and fine objects such as power lines or tree branches.
- Flying when the lighting changes frequently and drastically.
- Flying over extremely dark surfaces. (< 10 lux) or very bright (> lux 40,000).
- Flying over surfaces without a clear pattern or texture.
- Flying over surfaces with identical repeating patterns.
Note: If you require components for your quadcopter, then view this large selection of Mavic 2 parts, upgrades and accessories.
DJI Mavic Care Refresh
The Mavic Care Refresh provides two replacement units for a small additional charge in one year and covers a wide variety of accidents, giving you greater peace of mind. Click on the below link to read the FAQ and pricing.
Mavic 2 Obstacle Sensing Vision System Information
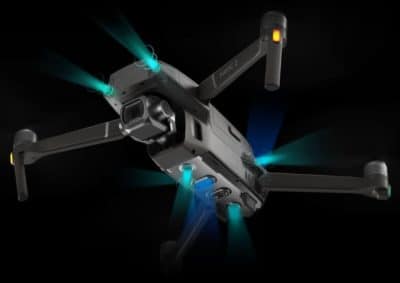
The new Mavic 2 Pro and Zoom can sense objects in 6 directions. Known as Omnidirectional Obstacle Sensing, this includes left, right, up, down, forward and backward obstacle sensing.
Obstacle sensing for left and right directions is only available in ActiveTrack or Tripod Mode.
Now, while all 6 sides of the Mavic 2 are covered for obstacle sensing, Omnidirectional Obstacle Sensing does not fully cover the full 360 degree circumference arc of the quadcopter.
Please see the DJI Mavic 2 user manual for diagrams showing the obstacle sensing coverage around the quadcopter.
How the Mavic 2 Obstacle Sensing Works
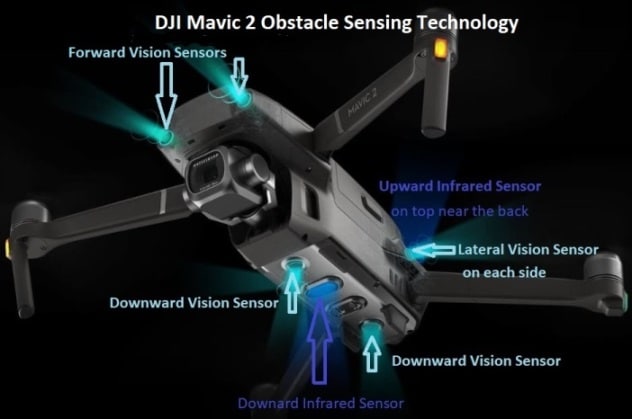
The Mavic 2 Pro and Mavic 2 Zoom are equipped with Forward, Backward, Downward and Lateral Vision Systems including Upward and Downward Infrared Sensing Systems. These all provide omnidirectional obstacle detection, providing lighting conditions are adequate.
The main components of the Forward, Backward and Downward Vision Systems are 6 camera sensors located on the nose, rear end and underside of the Mavic 2 quadcopter.
The lateral Vision System are 2 cameras with one camera on each side of the Mavic 2 quadcopter.

The main components of the Upward and Downward Infrared Sensing Systems are 2 x 3D infrared modules located on the top and underside of the Mavic 2 quadcopter.
The Downward Vision System and Infrared Sensing System helps the Mavic 2 maintain its current position and hover in place very precisely. The Vision and Infrared Sensing system allow the Mavic 2 to fly indoors or in other areas where a GPS signal is unavailable.
Mavic 2 Bottom Auxiliary Light
The Auxiliary light located on the underside of the Mavic 2 improves visibility for the Downward Vision System in bad light conditions.
Obstacle Sensing is fascinating technology and you can read further in this article entitled “Top Collision Avoidance Drones And Obstacle Detection Explained“.
Here is a shorter version from DJI on how to calibrate the Mavic 2 VPS.