Knowing how to update your 3DR Solo firmware to the latest version is very important. The Solo firmware upgrades will fix bugs in the software along with adding new flight features giving you a far better flying and filming experience.
Upgrading the firmware software on the Solo remote controller and quadcopter is pretty easy.
The whole process takes approximately 15 mins overall. We will take you through the steps here with an excellent video at the end.
3DR really pack their firmware upgrades with plenty of new features for the Solo quadcopter, the GoPro camera and the remote controller. They have added new flight control systems, introduced extra features to the Solo App and expanded their SDK software.
Solo Update Benefits
Some great new features to the 3DR Solo have come through firmware updates. That is one of the reasons to always upgrade to the latest and greatest firmware update.
Here is just a sample of some great features which were added to the 3DR Solo quadcopter through firmware updates.
Burst Mode: allows your GoPro HERO 4 to shoot up to 30 stills in one second.
DroneKit-Python 2.0: This software development kit is designed for use in supporting advanced usage like high-level path planning, computer vision and 3D maps. You can also use this SDK to control drones from desktop computers and ground station apps, communicating easily over a higher-latency RF link.
Adjust Exposure Value: Exposure determines how bright/dark your video is so it is great to be able to change this when necessary.
Intelligent Flight Modes: Multi-point Cable Cam, Free Look and airspace information have all been added to the Solo through firmware updates.
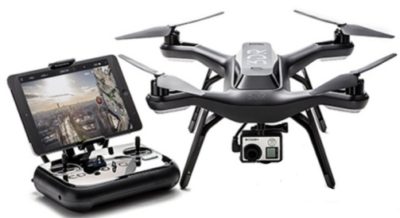
3DR Solo Firmware Upgrade
Best Practice Before Updating The Solo
 Check the Solo is OK: When you first receive you 3DR Solo, it is best to give it a small test flight. Once you know your Solo quadcopter is flying correctly, then bring it back in and upgrade the firmware.
Take your time: Never rush a firmware update. For your first update, give yourself 1 hour. The whole process only takes about 10 minutes.
However, in the beginning you need to read the documentation, become familiar with the update process and make sure you have a very good WiFi connection etc.
Location: Have plenty of space and a quiet area so you can concentrate on the upgrade. You definitely don’t want the family pet licking your ear or sitting on your tablet, Solo remote controller or quadcopter during the update.
On the Ground: Do not try to perform the Solo firmware update while the aircraft is still flying in the air. Only carry out the firmware update when the aircraft is landed.
Batteries Charged: Have at least 50% in your batteries before starting the update. Best practice is to have fully charged batteries in both the quadcopter and remote controller.
Internet Connection And WiFi: Make sure you have a strong internet connection to download the firmware to your mobile device. If the download is interrupted, then you may have a corrupt firmware. You should download the firmware again. Check the Solo WiFi signal between remote controller and Solo quadcopter is also strong. Again, you don’t want any interruptions while the quadcopter is updating.
3DR Solo Parts Check: Before you start the firmware update, it is a great time to check the 3DR Solo parts starting with the propellers, motors, arms, body and legs of the drone. If you notice anything bent or cracked, then replace these parts. Don’t take chances flying your drone when parts are damaged.
Note: If you need any components or accessories for your quadcopter then check out the 3DR parts page on Amazon.
How To Update The 3DR Solo Firmware
- Switch on both your Solo Ground Station Controller and Solo quadcopter.
- If the Solo is new, you will see a “Preflight Update” message when you first switch on the Solo Controller.
- Open the Solo App on your iPad, tablet, or smartphone device.
- Navigate to the “Settings” menu in the Solo App, and select “Software Update”.
Connecting Mobile Device / Solo Controller / Quadcopter
- Now if the Solo is new, you will need to link your mobile device with the Solo quadcopter using the WiFi (SoloLink). At the bottom of the screen, click on the “Connect Instructions” and follow the information. Once connected, then return to the Solo App.
- Now in the 3DR Solo App, it will show a new firmware update on screen. You will see your current Solo firmware version on the left. The new Solo firmware version will be on the right.
Downloading 3DR Solo Firmware Update
- Click on “Download Update” at the bottom of the screen. For this step you will need an Internet connection, either cellular data or WiFi. If you use WiFi, you’ll need switch from SoloLink to your WiFi network. The Solo firmware will be downloaded your tablet or cellphone. The firmware size can vary for one update to the next but it will be in and around 150 MB in size.
Transfer Update To Solo And Ground Station
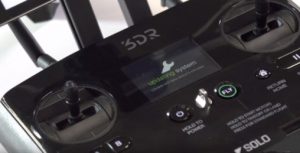
- Click on “Begin” green button. During the update, the controller will show a message saying “Controller Updating” on the display. The controller completes a full restart as part of the update process. The whole process at this point can take up to five minutes.
- Because the Controller must restart as part of the update, your device will lose its connection to Solo WiFi.
- The Controller restarts and displays a green check mark with a message saying “Controller Updated” to indicate a successful update. When you see the green check mark on the controller, reconnect to Solo WiFi in the app.
- Press “A” on the controller to continue the update. After you press “A”, your Solo quadcopter will restart to complete the update. While Solo restarts, the controller displays “waiting for Solo.”
3DR Solo Update Completed
- When the update is complete, Solo’s LEDs turn green, the controller will return to the standard takeoff screen, and the App will show that the software is now up to date. After displaying green, Solo’s LEDs return to the standard white-and-red pattern. If you do not see white-and-red LEDs after a few minutes following the update, then restart your Solo quadcopter.
- Click on “Go Fly”
Here’s a terrific video which takes you step by step through the whole 3DR Solo firmware update. Watch this a couple of times until you will feel very comfortable to do the upgrade.
Also, visit the 3DR website for their drones and technologies.