The Phantom 3 IMU calibration procedure is simple and takes between 5 and 10 minutes. The IMU calibration will fix most of the Phantom 3 issues including erratic flying, no signal and compass errors.
The IMU calibration will fix excessive warm up times, off horizon viewing issues and the usual yellow and red flashing lights after completing the normal Phantom 3 compass calibration. This post shows you how to calibrate the IMU on the Phantom 3 along with some tips.
While the Phantom 3 is great value and a beautiful quadcopter, a crashed quadcopter is of no value. Take a few minutes to examine your quadcopter components before flying. Make sure the motors and props are running freely and that there is no sign of any physical damage.
Phantom 3 IMU Calibration Procedure
If you feel your Phantom 3 is not flying correctly, bring it back in safely. Pay close attention for any warning lights on the quadcopter and warning signals in the DJI Pilot App. This errors and warning will help you troubleshoot the problems.
While this post concentrates on the Phantom 3 IMU calibration, you can also calibrate the gimbal and remote controller on the Phantom 3. You will find these calibration options in the Phantom 3 Pilot app.
How To Calibrate IMU on Phantom 3
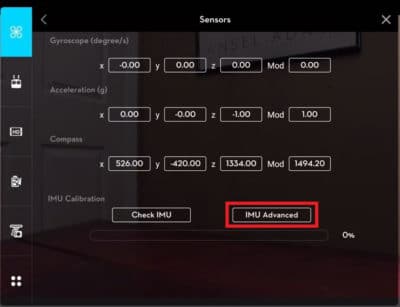
Before you re-calibrate the Phantom 3 IMU you can also check it first in the DJI Pilot App.
The Phantom 3 should not be moved at all during the IMU calibration process otherwise the procedure will fail.
If the IMU is really out of sync, you may have to do this procedure more than once. Place your Phantom 3 on a flat surface. Use a spirit or bubble level to check for a nice flat surface.
If possible, have at least 50% charged battery in the Phantom 3. You definitely don’t want the quadcopter giving battery warnings or stopping during the IMU calibration process.
- Switch on your Remote Controller and then switch on your Phantom 3. There is no need to switch on the motors.
- Open the DJI Phantom 3 Pilot App. Click on “Camera”.
- Next tap the “Mode” icon which is 2nd button in the upper left part of the screen.
- Tap into the “Sensors” in the MC Settings, then click on IMU Calibration.
- Click “OK” and “OK” again on the pop up messages to start the calibration process, which can take 5 to 10 minutes.
You should see the calibration process bar reaching 100%.
Below, I have 2 videos which take you step by step through the IMU calibration on the Phantom 3 as well as some of the most common problems that have been showing up on the Phantom 3 and how to fix them.
Also, it is always a great idea to see if there is a new Phantom 3 firmware upgrade available. These firmware upgrades will have fixes for bugs and issues with the quadcopter.
You can also visit the DJI Support and DJI Forums for further assistance if you have continued problems with your quadcopter.
Note: If you need any components or accessories for your quadcopter, then check out our DJI Phantom 3 parts, upgrades and accessories page.
Here’s another quick video on how to calibrate the Phantom 3 and Inspire 1 IMU.