Here are the best camera settings for the Phantom 4 Pro. Whether taking photos or filming with your Phantom 4 Pro, there is a huge range of camera settings to choose from.
If the Phantom 4 camera is not set up correctly from the start, then the aerial film will not be high quality. It may take a number of flyovers to get the settings correct and produce the aerial film which you need.
Also, if the Phantom 4 camera is set correctly before and during filming, it will take little or no work with your video or photo editing software.
Below, you will find the best values and settings for the Phantom 4 camera. We explain what each camera setting does, so you know what needs to be changed in the various circumstances or while filming.
Along the way, we have some terrific videos and links to gain further knowledge.
DJI Phantom 4 Best Camera Settings
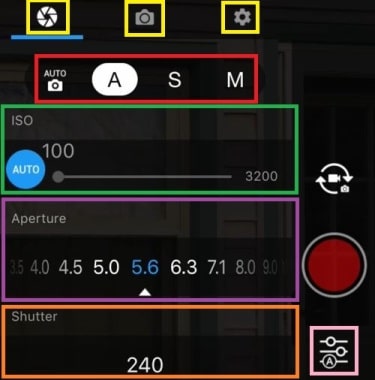
For access to the Phantom 4 Pro camera settings, click into the advanced camera settings, which is the icon under the red shutter button (3 lines with circles) in the DJI Go 4 app.
In here, we have 3 icons, which are Aperture, Camera and the Gear icon. We will go through each of the settings and values in each to assist you to get the best aerial photos and film.
Let’s start with the Phantom 4 aperture icon.
Aperture Icon
Under the Phantom 4 Pro aperture camera setting, you have the following options;
- Auto
- Aperture Priority
- Shutter Speed
- Manual
You can read further about aperture, ISO and shutter speed along with the rule of thirds in our article, entitled, 15 Top Drone Photography Tips.
Auto Setting
With Auto selected, the Phantom 4 camera settings for ISO, aperture and shutter speed are automatically adjusted to how the camera picks up the landscape and lighting.
Aperture Priority
With aperture priority selected, the shutter speed and ISO is automatically set, while the aperture setting can be changed while flying.
Aperture is one of the three pillars of photography. The other two being ISO and Shutter Speed. Aperture either adds a dimension to a photograph by blurring the background, or bringing everything into focus.
Aperture can be defined as the opening in a lens, in which light passes to enter the camera. The larger the hole the more light that gets in and the smaller the hole the less light.
Aperture is measured in f-stops. For example f/2.8, f/4, f/5.6,f/8,f/22 etc.
Moving from one f-stop to the next doubles or halves the size of the amount of opening in your lens (and the amount of light getting through).
Now, a change in shutter speed from one stop to the next doubles or halves the amount of light that gets in also. This means if you increase one and decrease the other you let the same amount of light in.
Here is a terrific video, which explains aperture in photography.
Shutter Speed Priority
The Phantom 4 Pro Shutter Speed priority setting is the exact opposite of the Aperture Priority setting above. When the Shutter Speed is selected, the aperture and ISO is automatically set, while the shutter speed setting can be changed while flying.
What Shutter Speed Is
Shutter Speed is perhaps the single most important camera setting for great aerial photography.
The camera’s shutter controls the amount of time, which light is allowed to reach the CCD or CMOS (in simple terms, the CCD / CMOS is where the digital image pixels are created). Shutter speeds are shown as multiples of one second.
1/500 sec
1/60 sec
1/30 sec
1/15 sec
1/8 sec
The shutter speed setting is a very creative setting for controlling the movement in a picture.
Here is a terrific article, which shows you shutter speeds photo examples.
Manual
With the Phantom 4 Pro manual camera setting, you can now control the ISO, Aperture and Shutter Speed.
Choosing Phantom 4 Manual Camera Settings
ISO – Start off at ISO 100 for aerial filming during the day. For evening or night time aerial filming, then ISO 400, 800, or even 1600 will work.
Shutter Speed – Whatever frames per second you are filming with, you multiply it by 2 for the shutter speed. So if you are filming at 60 frames per second, then you set the shutter speed to 120. Or if filming at 30 fps, then the shutter speed should be set to 60.
Aperture – Setting the aperture very much depends on the weather conditions, if sunny or cloudy or a bit of both. The higher the aperture value, the darker the image becomes and at the lower end of the aperture values, the image gets brighter.
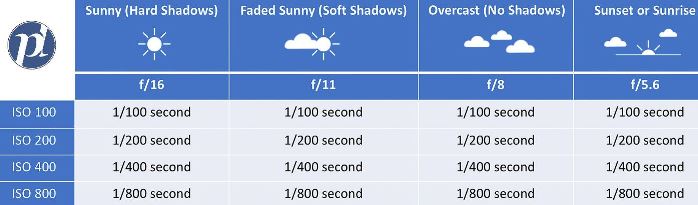
There is a rule called the Sunny 16. This rule is a simple way to determine a good exposure for a photograph. On a clear sunny day, when you are using an aperture of f/16, this rule recommends a shutter speed equal to the reciprocal of your ISO (1/ISO value).
At ISO 100, for example, use a shutter speed of 1/100th of a second. At ISO 200, use a shutter speed of 1/200 second.
Here is a terrific article, which explains, what is the Sunny 16 rule, and the below image from the same article is a guide to your aperture, ISO and shutter speed in the various weather conditions. You can also read another terrific article on how to use the Sunny 16 rule.
EV (Exposure Value) – When filming keep a close watch over the EV. It should be a close to zero or a slight bit on either side for best aerial shots.
Note: Using camera lens filters is a terrific way of capturing the best aerial shots with many filters for different weather conditions. You can find a nice selection of top quality Phantom 4 lens filters here.
Camera Icon
Click into the advanced camera settings and choose the middle tab for the camera.
DJI Phantom 4 Pro Video Size
The best option when aerial filming is to shoot in 4k video resolution. There are 2 choices of 4k video resolution, which are 4096 x 2160 and 3840 x 2160.
You then have a choice of filming in 24, 30, 48 and 60 frames per second in 4k. Film in 48 or 60 FPS will allow you to move down to 24 or 30 frames per second if need be.
Phantom 4 Pro Video Format
This is the type of file and format of the video, which is being recorded. The choices are as follows;
- MP4 – save using MP4 if you are saving the video to a Windows computer.
- MOV – save in MOV video format, if you are using an Apple computer.
NTSC/PAL
The Phantom 4 Pro NTSC/PAL cameras setting is important for the following reason;
NTSC stands for National Television Standards Committee. NTSC is the standard broadcast format in the United States, where electrical power for color transmission is generated at 60 hertz.
PAL stands for Phase Alternating Line. It is the standard broadcast format in Europe, Australia, and parts of Asia, where the electrical power for color transmission is generated at 50 hertz.
It is essential to film in the correct NTSC/PAL broadcasting format, as if you were to copy an NTSC video to a DVD and then tried to play in a European DVD player, then it would not play correctly and vice versa.
Phantom 4 Pro White Balance
Getting the white balance is extremely important. You have 6 options. Auto is very good. However, it is probably better to choose Sunny or Cloudy depending on the weather.
Incandescent is used if filming indoors under artificial light and fluorescent if you were filming under fluorescent lights. So, these wouldn’t be options when aerial filming.
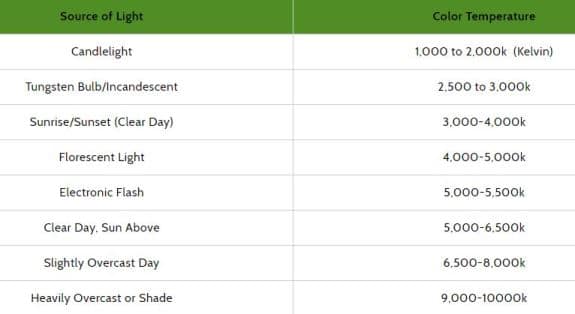
With the custom option, you can slide from the left at 2000 Kelvin, all the way to the right at 10,000 Kelvin color temperature. Here is a chart, which you can use to guide you in setting White Balance.
Style Camera Setting On Phantom 4 Pro
There are 3 x Phantom 4 Pro style settings, which are Standard, Landscape and Soft. There is also a Custom setting.
Each has values for Sharpness, Contrast and Saturation. The range is from -3 to +3 on each.
Most Phantom 4 Pro aerial cinematographers choose the Standard option. Then, they set the sharpness, contrast and saturation back in the the studio, using video editing software.
Here is a bit more information regarding Sharpness, Contrast and Saturation in filming and photography.
Sharpness: In photography, sharpness is the level of detail that is achieved in an image, considering numerous factors such as the lens, the camera, and the shooting technique which the photographer used.
Contrast: When filmmakers speak about contrast, they are talking about the tonal range of the image. Contrast is simply difference. In film, contrast usually alludes to tone and tone denotes the brightness of objects.
Saturation: Humans evaluate color in 3 primary ways, which are hue, value and saturation. Color saturation is the intensity and purity of a color as displayed in an image. The higher the saturation of a color, the more vivid and intense it is. The lower a color’s saturation, the closer it is to pure gray on the grayscale.
Color Profiles On Phantom 4 Pro
These color profiles are digital filters. These give various colors, which can be flatter to more vivid. Perhaps, the best option is to film with no color profile and you can edit in post production.
Camera Video Coding On Phantom 4 Pro
There are 2 choices for the Phantom 4 Pro camera video coding. These are H264 and H265.
H.264 is an industry standard for video compression, the process of converting digital video into a format, which takes up less capacity when it is stored or transmitted. Video compression (or video coding) is an essential technology for applications such as digital television, DVD-Video, mobile TV, videoconferencing and internet video streaming.
H.265, also known as High Efficiency Video Coding (HEVC) is a video compression standard, which is the successor to the above H.264. In comparison to H.264, HEVC offers from 25% to 50% better data compression at the same level of video quality, and substantially improved video quality at the same bit rate. It supports resolutions up to 8192 × 4320, including 8k UHD.
With the Phantom 4 Pro, you can only film in 4k at 60 frames per second in H.264 so choose this option. If you want to film in H.265, then film at 30 frames per second.
Gear Tab
In the Phantom 4 Pro advanced camera settings, choose the gear icon. In here we will walk through these Phantom 4 Pro camera settings.
Histogram
A histogram in photography is a graphical representation of the tonal values of your image. It shows the amount of tones of particular brightness found in your photograph, ranging from black (0% brightness) to white (100% brightness).
It shows whether a shot is under or over exposed. Turn this setting on by sliding the button to the right.
When filming, it is good to watch the histogram. When filming, you are looking to keep the values in and around the middle.
Front LEDs Auto Turn Off
You can slide this to the right to turn off, as you don’t want the front LEDs on the Phantom 4 effecting the lighting of your shots.
Now, the front LEDs show the orientation of the quadcopter. The front LEDs glow a solid red when the Phantom 4 Pro is turned on.
The back LEDs are for the flight status of the quadcopter with red, green and yellow lights depending on the status of the Phantom 4.
Refer to Page 14 of the Phantom 4 Pro manual for the full indicator descriptions for the back LEDs.
Over Exposure Warning
Turn this setting on. When an image is brighter than it should be, it is considered overexposed. When too much light is allowed during exposure, the result is an overly bright photograph.
Here is an terrific article, which explains underexposure and overexposure in photography.
Focus Assistant
Turn both AF and MF Assistant on. AF stands for Auto Focus and MF for Manual Focus.
Auto Focus Vs Manual Focus
Here is an top article, which gives you ideas and information on using Auto Focus or Manual Focus.
This next video describes the various focus options on many cameras, including Continuous Auto, Single and Manual.
Grid
The Phantom 4 Pro Grid setting on your camera shows horizontal and vertical lines, to allow you to assess the proportions of the landscape view.
This is also called the Rule of Thirds. The point of this is to put your subject along a vertical of a horizontal line. Your subject should be along the intersections.
In the Phantom 4 Pro camera settings the GRID options are as follows;
- None
- GRID Lines
- Grid + Diagonals
In the beginning, it is often good to use the GRID lines turned on. With the grid lines turned on, you can see that your camera gimbal is perfectly aligned with the skyline, horizon or whichever landscape you are filming.
Center Points
Center Points help with positioning the point of interest in the photo. As we know, it’s not always the best shot to have the point of interest in the very center of the photo.
Using Center Points, also help greatly with following rivers or railway tracks etc. If you want to automatically follow a subject, then the Phantom 4 Pro is one of the best drones on the market. You can find out more about all the Phantom 4 Pro intelligent flight modes here.
In the Phantom 4 Pro camera settings you have the following Center Points including the option of switching it off.
- None
- Circle
- Cross
- Narrow Cross
- Square (No Center Point)
- Square (with Center Point)
- Bracket (No Center Point)
- Bracket (with Center Point
Anti-Flicker
The Phantom 4 Pro anti-flicker settings are as follows;
- Auto
- 50 Hz if you are in the Europe
- 60 Hz if you are in the Unites States
The Phantom 4 Pro anti-flicker camera setting is used when recording video in artificial light such as flood lighting, street lighting or flying indoors.
Now, if you choose the wrong Hz, you will have a flicker effect in your footage. Also, the Phantom 4 Pro anti-flicker should match the PAL/NTSC, which is mentioned at the top of this article. This is 50 Hz for PAL and 60 Hz for NTSC.
File Index Mode
The file index mode is how DJI saves the files onto the memory card. Now, when the files are moved to a computer and the card is put back in the Phantom 4, the file index mode determines the names of your next videos. At reset it will go back to the original first name. With continuous, it will continue on the file name sequence.
- Reset
- Continuous
“Continuous” is the best option.
Best Phantom 4 Camera Settings Tutorial
The Phantom 4 has a tremendous range of manual camera settings. In many circumstances, using the auto camera setting just doesn’t capture the scene correctly. You need to switch and choose the camera settings manually.
This next video tutorial will show you how to use the Phantom 4 camera to get the best aerial film and photos no matter what the conditions are.